
本記事では、Google Apps Script(GAS)の初歩から便利な使い方、そしてビジネスでの活用方法まで幅広く解説していきます
今回は、「スプレッドシートのデータを取得し、条件に応じてメールを送信する」方法を紹介します
GASやスプレッドシートに全く触れたことがない方、何から始めればいいか分からない方、既にGASを使い始めたけれどさらに活用方法を模索中の方、そして単純にGoogleが好きな方、皆さんに役立つ情報をお届けします。
GASを利用する上で、「GASの制限回数」を意識することは欠かせない要素です
 こーすけ先生
本記事では、「GASの制限回数」を意識しながら、Googleの主要サービスにアクセスする方法を紹介したいと思います!

 こーすけ先生
当ブログでは実際に仕事でGASを扱っている私が、GASの魅力について徹底的に取り上げていきます!
スプレッドシートのデータを取得し、条件に応じてメールを送信する
 こーすけ先生
張り切って演習に取り組んでいきましょう!
 こーすけ先生
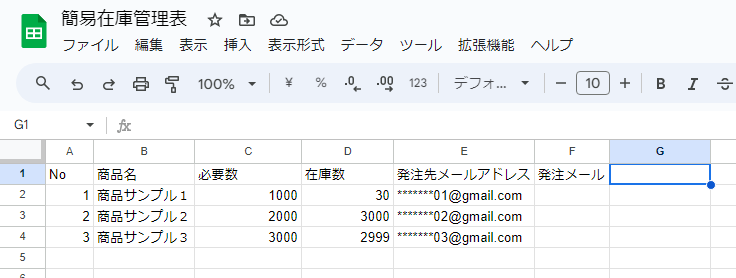
今回、こちらの「簡易在庫管理表」を使って演習します!
必要に応じてコピーして使ってください!
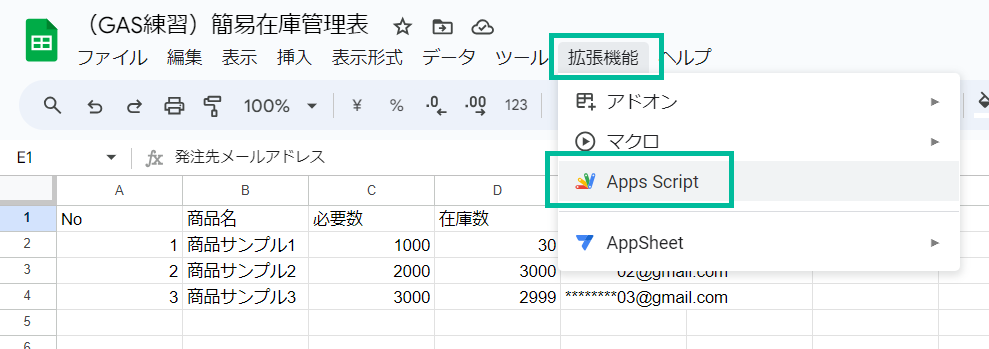
【STEP1】スプレッドシートを作成し、GASエディタを開く
 こーすけ先生
今回は、「コンテナバインド型」でやってみたいと思います!

【STEP2】スプレッドシート内のすべてのデータを取得する
function inventory_SpreadSheet() {
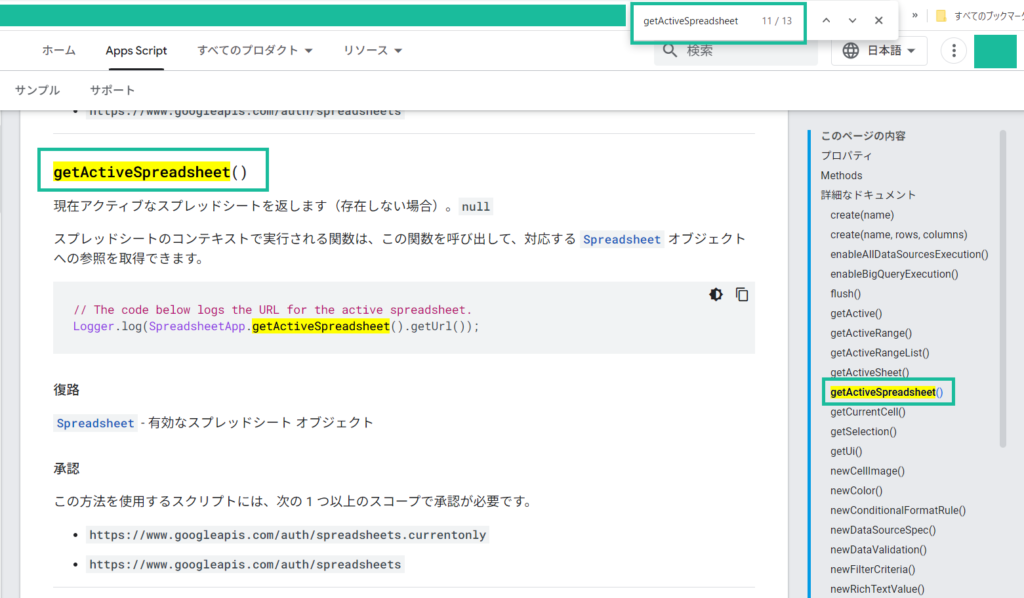
// コンテナバインド型なので、getActiveSpreadsheetにより自分自身を取得する
const wSpread = SpreadsheetApp.getActiveSpreadsheet();
// 以下の記述でも可能(単なるエイリアスの違いのみ)
// const wSpread = SpreadsheetApp.getActive()
// スプレッドシート内の1番目のシートを取得する
const wSheet = wSpread.getSheets()[0];
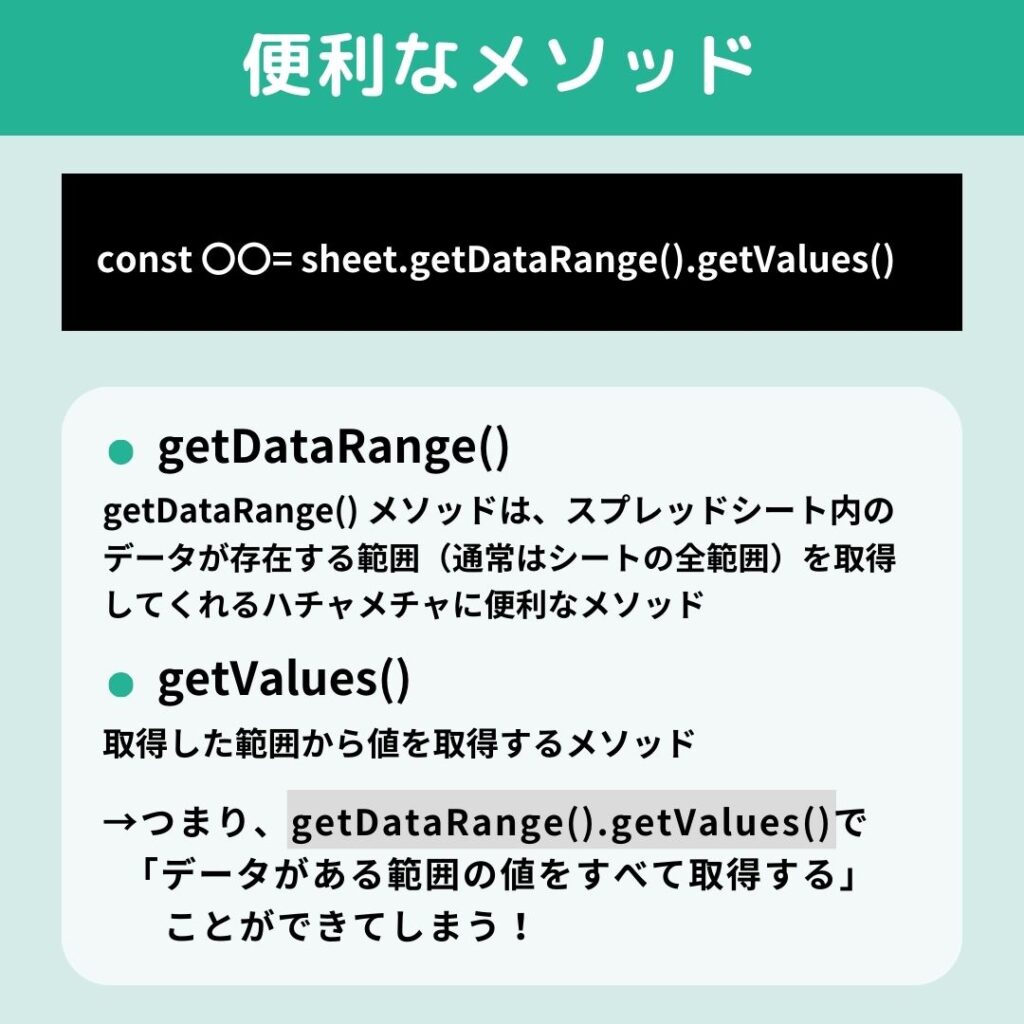
// シート内の全データを取得する。
// getDataRangeはデータが存在する範囲のみを取得してくれるため非常に便利
let wVals = wSheet.getDataRange().getValues();
console.log(wVals);
}実行結果
13:57:05 お知らせ 実行開始
13:57:06 情報 [ [ 'No', '商品名', '必要数', '在庫数', '発注先メールアドレス', '発注メール' ],
[ 1, '商品サンプル1', 1000, 30, '*******01@gmail.com', '' ],
[ 2, '商品サンプル2', 2000, 3000, '*******02@gmail.com', '' ],
[ 3, '商品サンプル3', 3000, 2999, '*******03@gmail.com', '' ] ]
13:57:07 お知らせ 実行完了全ての値が取得できました!
 こーすけ先生
.getDataRange().getValues()は、スプレッドシート内のデータが存在する範囲から値を取得できて便利です!
Google スプレッドシートのクラス一覧

 こーすけ先生
Ctrl+F で調べたいクラスやメソッドを探したり、やりたいことから逆引きしてみたり…と是非、公式リファレンスを確認してみてください!
【STEP3】1行ごとにデータを処理して、[必要数]>[在庫数]の行を特定する
// ここから追加コード
const COL = {
  NUM:1
  , PRODUCT_NAME:2
  , REQUIRED_QUANTITY:3
  , INVENTORY_CNT:4
  , MAIL:5
  , MAIL_TIMESTAMP:6
}
// ここまで

function inventory_SpreadSheet() {
  // コンテナバインド型なので、getActiveSpreadsheetにより自分自身を取得する
  const wSpread = SpreadsheetApp.getActiveSpreadsheet();
  // 以下の記述でも可能(単なるエイリアスの違いのみ)
  // const wSpread = SpreadsheetApp.getActive()

  // スプレッドシート内の1番目のシートを取得する
  const wSheet = wSpread.getSheets()[0];

  // シート内の全データを取得する。
  // getDataRangeはデータが存在する範囲のみを取得してくれるため非常に便利
  let wVals = wSheet.getDataRange().getValues();
  console.log(wVals);

  // ここから追加コード
  // 1行目(index:0)はヘッダー列なので、2行目からデータを走査
  for (let rIdx=1; rIdx<wVals.length; rIdx++) {
    // [必要数]>[在庫数]の行を特定する
    if (wVals[rIdx][COL.REQUIRED_QUANTITY-1]>wVals[rIdx][COL.INVENTORY_CNT-1]) {
      console.log(rIdx+1+"行目は[必要数]>[在庫数]");
    }
  }
// ここまで
}
実行結果
16:11:31 お知らせ 実行開始
16:11:32 情報 2行目は[必要数]>[在庫数]
16:11:32 情報 4行目は[必要数]>[在庫数]
16:11:32 お知らせ 実行完了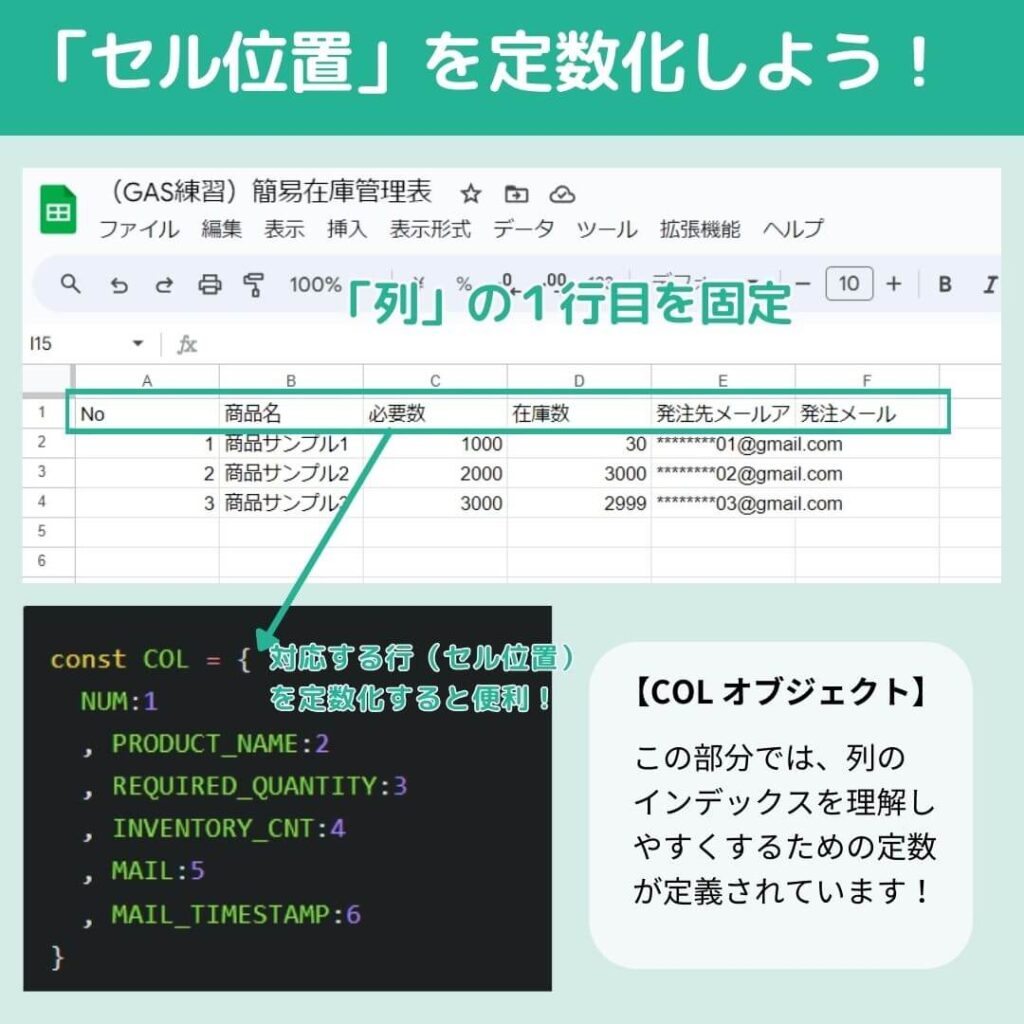
定数を使用してセル位置を一元管理すると、セルの位置が変わった場合に定数のみを変更すれば済むため、コード全体を変更する必要はありません
定数を使用することは、コードの可読性、保守性、およびエラーの削減に貢献します
こーすけ先生スプレッドシートを扱う場合は、セル位置を定数化しておくと便利です!
これにより例えば列が追加、削除された場合に、定数だけを変更すれば、処理側を変更する必要がなくなります!
 がすぴょん
がすぴょんなるほど!
仮にセル位置を変更したい場合、新しい列のインデックスに対応する値に変更すればよいってことか!これは覚えておきたい…
【STEP4】[発注メール]欄が空であれば[発注先メールアドレス]にメールを送信する
それでは上記で特定した[必要数]>[在庫数]となっている行の場合は、[発注先メールアドレス]に設定されたアドレスにメールを送信してみましょう
const COL = {
NUM:1
, PRODUCT_NAME:2
, REQUIRED_QUANTITY:3
, INVENTORY_CNT:4
, MAIL:5
, MAIL_TIMESTAMP:6
}
function inventory_SpreadSheet() {
// コンテナバインド型なので、getActiveSpreadsheetにより自分自身を取得する
const wSpread = SpreadsheetApp.getActiveSpreadsheet();
// 以下の記述でも可能(単なるエイリアスの違いのみ)
// const wSpread = SpreadsheetApp.getActive()
// スプレッドシート内の1番目のシートを取得する
const wSheet = wSpread.getSheets()[0];
// シート内の全データを取得する。
// getDataRangeはデータが存在する範囲のみを取得してくれるため非常に便利
let wVals = wSheet.getDataRange().getValues();
// 1行目(index:0)はヘッダー列なので、2行目からデータを走査
for (let rIdx=1; rIdx<wVals.length; rIdx++) {
// [必要数]>[在庫数]の行を特定する
if (wVals[rIdx][COL.REQUIRED_QUANTITY-1]>wVals[rIdx][COL.INVENTORY_CNT-1]
// ここから追加コード
&& wVals[rIdx][COL.MAIL_TIMESTAMP-1]=='') {
GmailApp.sendEmail(
wVals[rIdx][COL.MAIL-1]
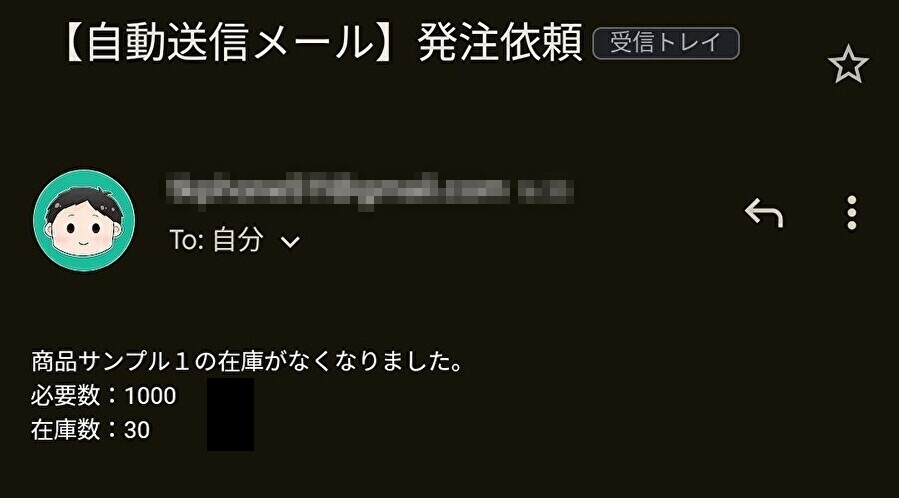
, `【自動送信メール】発注依頼`
, `${wVals[rIdx][COL.PRODUCT_NAME-1]}の在庫がなくなりました。
必要数:${wVals[rIdx][COL.REQUIRED_QUANTITY-1]}
在庫数:${wVals[rIdx][COL.INVENTORY_CNT-1]}`
)
// ここまで
}
}
} こーすけ先生
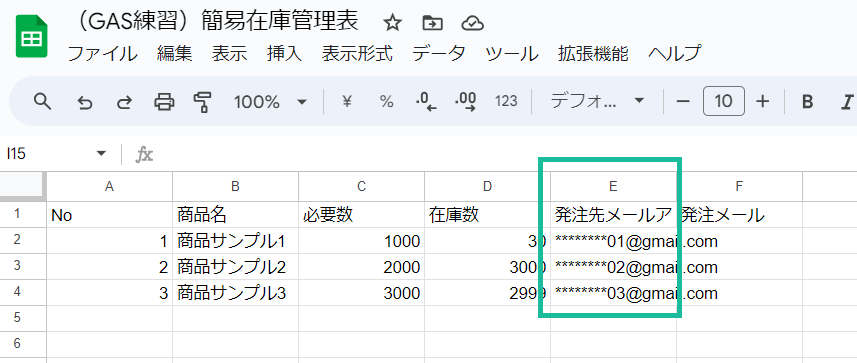
スプレッドシート上の[発注先メールアドレス]には試しにご自身のメールアドレスなどを設定してみてください。
「▷実行」をクリックして、Gmailを確認するとメールが送られてきます
余談
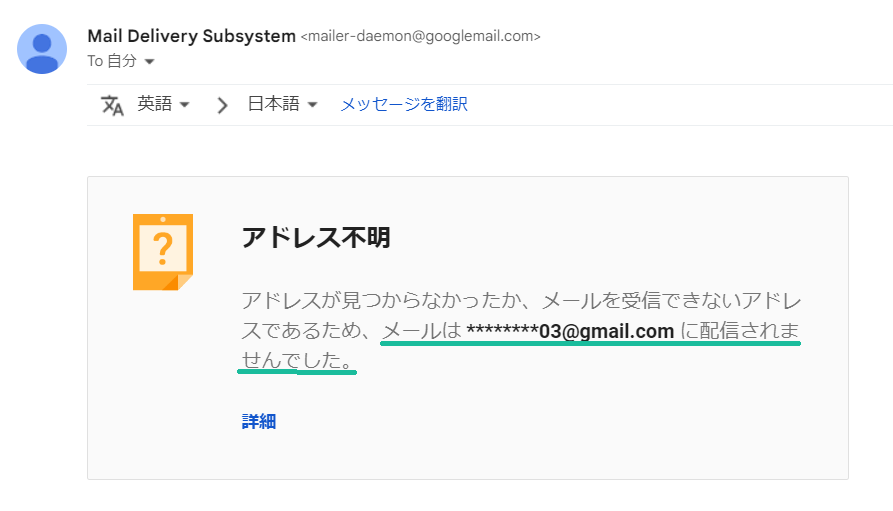
がすぴょんサンプルのままにしたら、「配信されませんでした」ってメールがきたよ!
【STEP5】メールを送信した後に[発注メール]欄に送信日時を記入する
こーすけ先生それでは最後にメール送信後にその記録を[発注メール]欄に記入しましょう
const COL = {
  NUM:1
  , PRODUCT_NAME:2
  , REQUIRED_QUANTITY:3
  , INVENTORY_CNT:4
  , MAIL:5
  , MAIL_TIMESTAMP:6
}

function inventory_SpreadSheet() {
  // コンテナバインド型なので、getActiveSpreadsheetにより自分自身を取得する
  const wSpread = SpreadsheetApp.getActiveSpreadsheet();
  // 以下の記述でも可能(単なるエイリアスの違いのみ)
  // const wSpread = SpreadsheetApp.getActive()

  // スプレッドシート内の1番目のシートを取得する
  const wSheet = wSpread.getSheets()[0];

  // シート内の全データを取得する。
  // getDataRangeはデータが存在する範囲のみを取得してくれるため非常に便利
  let wVals = wSheet.getDataRange().getValues();

  // メール送信記録の書き込み用リストを生成する
  let wWriteLst = new Array();

  // 1行目(index:0)はヘッダー列なので、2行目からデータを走査
  for (let rIdx=1; rIdx<wVals.length; rIdx++) {
    // [必要数]>[在庫数]の行を特定する
    if (wVals[rIdx][COL.REQUIRED_QUANTITY-1]>wVals[rIdx][COL.INVENTORY_CNT-1]
        && wVals[rIdx][COL.MAIL_TIMESTAMP-1]=='') {
      GmailApp.sendEmail(
        wVals[rIdx][COL.MAIL-1]
        , `【自動送信メール】発注依頼`
        , `${wVals[rIdx][COL.PRODUCT_NAME-1]}の在庫がなくなりました。
必要数:${wVals[rIdx][COL.REQUIRED_QUANTITY-1]}
在庫数:${wVals[rIdx][COL.INVENTORY_CNT-1]}`
      )
      // メール送信記録をwWriteTimeに書き込み
      wWriteLst.push([Utilities.formatDate(new Date(), 'JST', 'yyyy-MM-dd HH:mm:ss')]);
    } else {
      // メール送信しない場合は現状維持
      wWriteLst.push([wVals[rIdx][COL.MAIL_TIMESTAMP-1]]);
    }
  }
  // 一括でメール送信記録を貼り付け
  wSheet.getRange(2, COL.MAIL_TIMESTAMP, wWriteLst.length, 1).setValues(wWriteLst);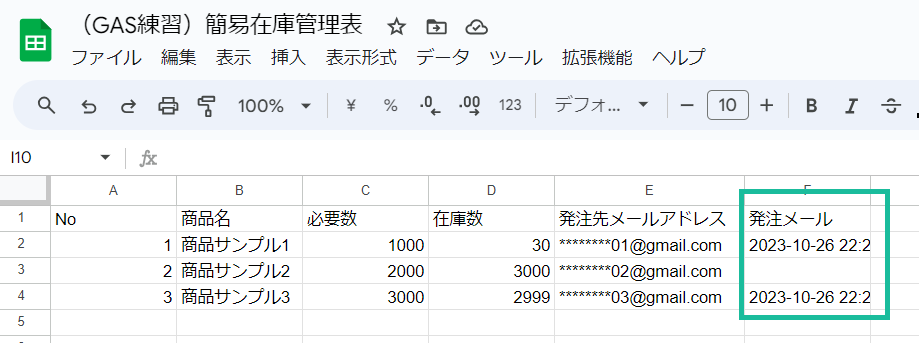
}上記プログラムを実行すると[発注メール]の箇所に送信日時が記録されます!
 がすぴょん
がすぴょんうわー!!
できた!!!なんだか感動!!!
本プログラムのポイントは以下のように最後に一括で貼り付けを行うことですwSheet.getRange(2, COL.MAIL_TIMESTAMP, wWriteLst.length, 1).setValues(wWriteLst);
//都度セルに書き込む場合
for (let rIdx=1; rIdx<wVals.length; rIdx++) {
  // [必要数]>[在庫数]の行を特定する
  if (wVals[rIdx][COL.REQUIRED_QUANTITY-1]>wVals[rIdx][COL.INVENTORY_CNT-1]
      && wVals[rIdx][COL.MAIL_TIMESTAMP-1]=='') {
…
    // メール送信記録をセルに書き込み
    wSheet.getRange(rIdx, COL.MAIL_TIMESTAMP).setValue(Utilities.formatDate(new Date(), 'JST', 'yyyy-MM-dd HH:mm:ss'));
  } else {
    // メール送信しない場合は現状維持
  }
}
こーすけ先生
for文でループさせながら、セルに書き込むことも間違いではありません
しかしながら、この場合は都度セルへのアクセスが発生し、処理時間は遅くなります
そこで、配列wWriteLstに送信記録をpushしていき、最後に一括で貼り付けを行った方が処理時間も早く、GASの制限回数に対しても有意義と言えます
 こーすけ先生
「使用制限」についてまとめた記事はこちらです!
まとめ
これまでとは異なりスプレッドシートのデータ取得や評価、さらにGmailと組み合わせるなど、少しずつ業務活用に足をかけ始めました
こーすけ先生GASをマスターして、業務を効率化しましょう!
本記事では、スプレッドシートのデータを取得し、条件に応じてメールを送信する方法に焦点を当てました
こーすけ先生X(旧:Twieer)にて、ブログの更新やQiita記事の更新、GAS情報をお届けしますので、是非フォローしてください!
 こーすけ先生
おかげさまで今年5月に起業しました!
GASやGoogleサービス、プログラミング全般のご相談承ります!